Monday, July 25, 2016

Progress Report : Coffee Bar

Hi everyone!  I'm excited to share some progress that I made in my house now that all of my room tours are over.

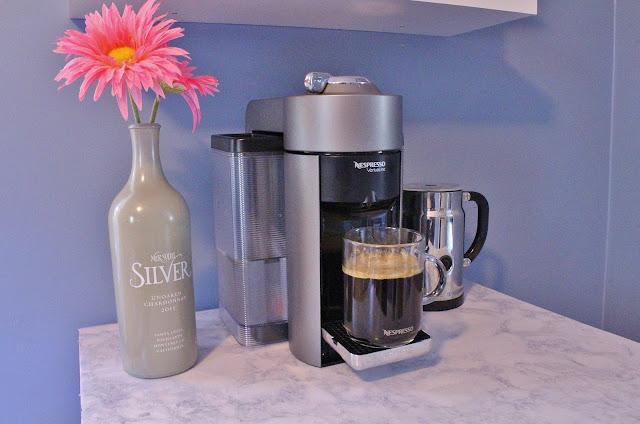
Back when I shared my eat-in kitchen plans, one of the projects I was most excited about was making a coffee bar.  I love drinking coffee, and since the kitchen area isn't very big I wanted a dedicated spot for my coffee mugs and coffee maker.  This is what I ended up with:


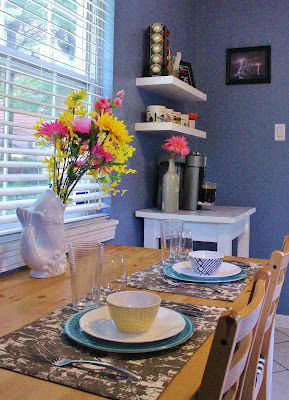
I decided to put the coffee bar in the eat-in area of the kitchen, in the corner near the living room.  It was the perfect space to fit an Ikea kitchen cart that I already owned, so I was happy to up-cycle some furniture instead of having to buy or build a new one!

This is what the cart looks like when you buy it from Ikea.  Great blank canvas!

The cart is actually a hand-me-down from my college roommate, and it comes in Ikea's standard unfinished birch wood.  At my first apartment, I painted the entire unit white with a greyscale pop-art mural on the top, and used it as a storage cart in my closet.  At my second apartment, the painting was still lasting really well, and I used it in the kitchen as a microwave stand and storage.

The original "coffee bar" that I set up when we moved!  Did the job, but not share-worthy

The first thing that I did to give the cart a new life was sand off the mural and cover it in marble contact paper.  The paper went down surprisingly smoothly, and I was able to smooth out any air bubbles or wrinkles with no issues.  I also sanded the sides so it had a nice, smooth edge.

"Marble" top!  It actually fools most people that come and see it in person!

Next, I added some shelves above the cart.  I got lucky and found wall-mounted shelves at Lowe's that were the exact width of the cart, and was able to easily hang them overhead.  I love how simple the shelves are, without any brackets or decorations, so the attention is really on the "marble" top! I use these to hold my mug collection, coffee, and some straws.

coffee bar with open shelving

I decided to splurge on a Nespresso machine to finish off the bar (you can't really have a coffee bar without the coffee, right?).  I picked the up Evoluo during a sale at Sur La Table, and I'm SO in love with it.  It makes incredible coffee, and I love the sleek, modern design.  The bundle I got also came with the Aeroccino, which heats and froths milk.  Other accessories that I picked up are mugs, espresso set, and capsule column

DIY coffee cart

I love how small but functional the coffee bar is.  It doesn't take up much space, but thanks to the storage in the cart and the shelves that I added, I don't need any more space!  Every time I see this corner of the kitchen, which is the first space that feels "finished", it makes me smile.  With the bright colors of the flowers, the mugs that are from places that I travel, and CAFFEINE- what's not to love?

Ikea BEKVÄM Kitchen cart coffee bar hack

And since everyone loves a before and after picture, let's see how far we'e come:


Source List:


Coffee or tea?
What are some of your favorite Ikea Hacks?
What was the first "room" you completed in your house?
post contains affiliate links.  this is not sponsored at all (in my dreams!)

Thursday, July 21, 2016

Quick and Easy Chalkboard Sign

Hi everyone!  Today I'm excited to share my first DIY project.  We're starting out really easy with a simple chalkboard sign.  This was the finishing touch on my coffee bar, which I'm going to be sharing shortly!  This project came together in less than five minutes, and I absolutely love it.

To get started, here are the supplies you'll need:


  • Chalk contact paper (I used this one)
  • Photo frame of any size and shape (I used this cheap one from Ikea)
  • Liquid chalk markers (I used these)


Once you've gathered up the supplies, here's how you make it:


1.  Take out the glass in the frame, clean it with an alcohol wipe to remove any oils or dirt, and line it up on the back of the contact paper.  Mine has a grid on the back, which made it easy to measure.  If yours is blank, just trace around the frame, and cut it out.


2.  Starting at one corner, peel off the back of the contact paper and line it up with the corner of the glass.  Working your way to the opposite corner, continue to peel off the contact paper and sticking it on the glass.


3.  If there are bubbles, use a plastic putty knife to smooth the paper.


4.  Trim any excess paper around the edges.  This is going to be covered by the frame, so you don't have to be too neat!


5.  Add the glass back to the frame, and you're done!


My frame came with a white border, so you can add that as well.  This didn't give me enough area to write on, so I ditched it.


7.  Decorate your chalkboard!  These chalk markers were really vivid and wrote easily, so I would highly recommend them.  This was a really small area to work on, so I think a larger frame would work out better!


Here is what the chalkboard looks like on my coffee bar.  I'll be sharing the entire bar in my next post, so stay tuned for that!

post contains affiliate links.  thank you for your support!

linking up with Amanda

Thursday, July 7, 2016

Home Plans : Bathroom

We finally made it to the final room in the house!  If you haven't seen the other home tours, you can find them all here, or look at the living room, kitchen (and eating area), office, and basement.  Today we're going to be talking about the bathroom!

To be honest, there's not much that I want to do with this space.  It's a really small bathroom, and everything is in good shape!  I want to make some cosmetic changes, but for the most part I'm fine with how this looks.  As usual, I'll be sharing "before" pictures, projects I want to do, and some inspo!


Before

As you can tell, this is a tiny bathroom.  It was really hard to get pictures of everything, so just imagine a big white tub/shower on the other side of the toilet and sink.

Project number one was replacing the burnt out lightbulb!

Thankfully, there's a huge closet in the bathroom!  Even though it's a tiny space, there's plenty of room for toiletries and other bathroom supplies.  This is beside the tub.


Projects

- Paint.  I'm not really a fan of the brown color (plus we already did some work and messed up the paint on one wall, so this is a necessity!).

- Add a medicine cabinet.  Right now there's just a mirror with a shelf, so I would love to add a medicine cabinet to increase our storage.

- Accessorize.  I want to add some open shelves above the toilet, and decorate the bathroom a bit!  It's looking really brown and boring right now, so this should make it look a bit better.

- Organize the closet.  It's such a mess right now, so I need to figure out a storage system!  Hello, Container Store!


Inspiration

source
Doesn't this look like a spa?  I love how simple but effective the storage is.

 
source

Such a simple, clean design.  I think this could work!


Who else has a tiny bathroom?  Any suggestions?
Which inspiration pic do you like better...1 or 2?

linking up with Amanda and What's New With You! (go check out my other blog!)